Battery switch on travel trailer function is crucial for managing your RV’s power. Understanding how to use and maintain your battery switch is key to avoiding frustrating power outages and ensuring a smooth camping experience. This guide covers everything from the basics of different switch types to troubleshooting common problems and even advanced configurations involving solar panels and multiple battery banks.
Let’s dive in and get you powered up!
We’ll explore the different types of battery switches – from simple on/off to more complex systems – and how they connect to your house batteries and your tow vehicle’s battery. We’ll also walk you through safe connection and disconnection procedures, emphasizing safety precautions to prevent electrical shocks and short circuits. Finally, we’ll tackle troubleshooting, maintenance, and even advanced setups to ensure you’re confident in managing your travel trailer’s power system.
Understanding Battery Switch Functionality in Travel Trailers: Battery Switch On Travel Trailer Function

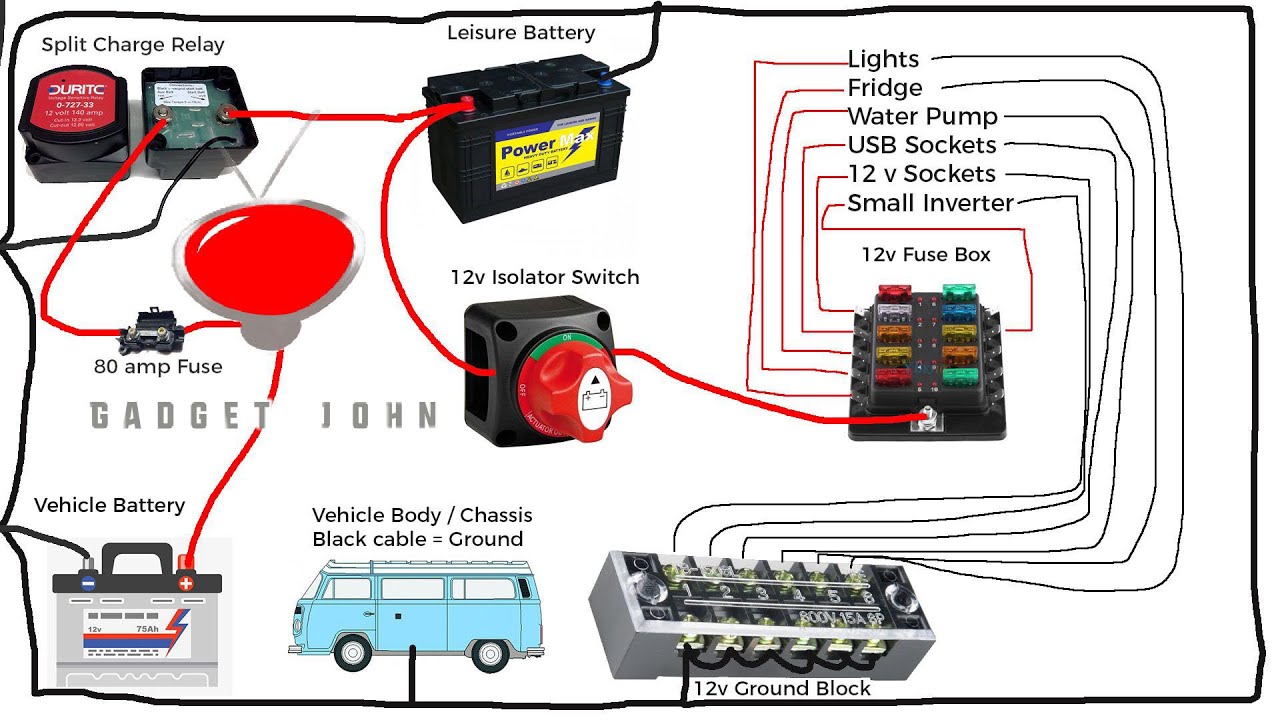
A battery switch is a crucial component in a travel trailer’s electrical system, allowing you to manage the power flow from your trailer’s batteries. It provides control over which battery bank (or banks) are connected to the trailer’s electrical system, protecting your batteries and preventing accidental drain. Understanding its function is key to maintaining your trailer’s power and preventing costly repairs.
Battery Switch Purposes
The primary purpose of a battery switch is to isolate and control the power flow from your trailer batteries. This is vital for several reasons: preventing deep discharge of your house batteries, allowing you to charge individual batteries separately, and to safely disconnect the batteries for maintenance or storage. Proper use extends battery life significantly.
Types of Battery Switches
Several types of battery switches are commonly used in travel trailers, each offering different levels of control. The most common are the 1-2-Both-Off switch and various types of single and double-pole switches.
1-2-Both-Off Battery Switch Wiring
The 1-2-Both-Off switch is the most common type. It allows you to select between two battery banks (often a house battery and a starting battery), use both simultaneously, or disconnect both completely. A typical wiring diagram would show the switch connected between the batteries and the trailer’s 12V distribution panel. Each battery’s positive (+) terminal would connect to a corresponding terminal on the switch.
The output of the switch (the “hot” side) would then connect to the positive bus bar on the distribution panel. The negative (-) terminals of both batteries would usually be connected directly to the chassis or a common ground point.
Single-Pole and Double-Pole Switches, Battery switch on travel trailer function
Single-pole switches control only one side of the circuit (positive or negative), while double-pole switches control both sides. Double-pole switches are generally safer, providing a complete break in the circuit when off, but are more complex to install. Single-pole switches are simpler but might not offer complete isolation.
Battery Switch Comparison
| Switch Type | Number of Batteries Controlled | Circuit Control | Safety |
|---|---|---|---|
| 1-2-Both-Off | Two | Positive | Moderate |
| Single-Pole | One | Positive or Negative | Low to Moderate |
| Double-Pole | One or Two | Positive and Negative | High |
Connecting and Disconnecting Batteries
Connecting and disconnecting your travel trailer’s batteries safely is crucial for preventing damage to your electrical system and avoiding personal injury. This section will guide you through the process, emphasizing safety precautions at each step. Remember, always consult your specific battery switch and trailer’s manuals for detailed instructions.Proper battery handling is essential for both safety and the longevity of your batteries.
Improper connection can lead to sparks, short circuits, and even battery explosions. Always wear safety glasses and gloves when working with batteries.
Battery Switch Operation
The battery switch acts as a central control point, allowing you to select which battery bank powers your trailer’s systems. Typical switches have multiple positions: “Off,” “Battery 1” (often the house batteries), “Battery 2” (often the truck battery), and sometimes a “Both” position, which connects both banks in parallel. The switch itself is usually a rotary dial or a series of toggle switches.
Each position will have a clearly marked indicator. When the switch is in the “Off” position, all power to the trailer is cut. In the “Battery 1” position, only the house batteries power the trailer. In the “Battery 2” position, only the tow vehicle battery powers the trailer (though this is less common). A “Both” position allows charging of the house batteries from the vehicle’s alternator.
So, you’re an audiophile who travels? Awesome! Check out this guide on building the perfect audiophile travel setup for amazing sound on the go. It’s all about portability without sacrificing quality. Then, once you’ve got your portable rig dialed in, consider how you’ll integrate it into your adventures; perhaps you’ll want to pair it with your next trip.
For instance, imagine enjoying pristine audio while on safari – the ultimate relaxation after a day of wildlife spotting, facilitated by a killer audiophile travel setup ! It’s all about finding that sweet spot between compact design and top-tier sound.
Visually, you’ll see the switch handle pointing to the selected position, clearly indicating the active power source. The battery terminals themselves will show voltage only when the corresponding battery bank is selected via the switch.
Connecting Batteries
Before connecting, inspect your batteries for any signs of damage, corrosion, or leaks. Clean the terminals with a wire brush and baking soda solution to remove any corrosion. Always connect the positive (+) terminal first. This terminal is usually marked with a “+” symbol or a red color. Secure the positive cable to the positive terminal, ensuring a tight connection.
Then, connect the negative (-) terminal, usually marked with a “-” symbol or black color. When the switch is in the “Off” position, connecting the batteries will not result in any power flow. Once connected, you can move the switch to your desired position (“Battery 1,” “Battery 2,” or “Both”) to power your trailer systems. Observe the voltage at the battery terminals and the functioning of your trailer’s systems to confirm a proper connection.
So, you’re an audiophile who travels? Awesome! Check out this guide on audiophile travel setups for tips on packing your precious gear. It’s crucial to protect your headphones and portable DAC, right? Then, once you’ve mastered the basics, explore more advanced setups – maybe even consider a dedicated portable amplifier. For those adventurous souls who want to combine their love of music with wildlife viewing, there’s another great resource: audiophile travel aetup for the ultimate nature soundtrack experience.
Remember, good sound on the go is totally achievable!
Disconnecting Batteries
To disconnect, reverse the connection process. First, disconnect the negative (-) cable from the negative terminal. Then, disconnect the positive (+) cable from the positive terminal. Always disconnect the negative terminal last to prevent accidental short circuits. Once disconnected, move the battery switch to the “Off” position to completely isolate the trailer’s electrical system.
This prevents accidental power drain and protects your equipment. Visually, after disconnection, you should see no voltage at the battery terminals and the switch handle should be in the “Off” position.
Switching Between House and Tow Vehicle Batteries
Switching between your house batteries and your tow vehicle battery is usually done via the battery switch. To use the house batteries, select “Battery 1” on the switch. The switch handle will indicate this position. Your trailer’s systems will be powered by the house batteries. To use the tow vehicle battery, select “Battery 2.” The switch handle will point to this position, and your trailer’s systems will then draw power from the tow vehicle battery.
Remember, the “Both” position (if available) should only be used when the vehicle is running to charge the house batteries. During this process, you will visually observe the switch position change and, if you have a voltmeter, you can confirm the voltage source.
Troubleshooting Common Battery Switch Issues
Your travel trailer’s battery switch is a crucial component, and problems with it can leave you stranded. Fortunately, most issues are relatively straightforward to diagnose and fix with some basic troubleshooting. This section will guide you through identifying and resolving common problems.Troubleshooting a faulty battery switch usually involves systematically checking several key areas. Remember safety first – always disconnect the negative battery terminal before working on any electrical components.
Identifying Common Problems
Common problems with travel trailer battery switches range from a complete lack of power to blown fuses. Sometimes, the issue might be a simple loose connection, while other times it could indicate a more serious problem with the switch itself. Understanding the possible causes allows for a more efficient troubleshooting process. For example, a blown fuse might point to an overload in the system, while a completely dead battery indicates a charging problem independent of the switch.
Troubleshooting Steps
Let’s walk through a step-by-step process to troubleshoot a non-functional battery switch. This systematic approach helps pinpoint the problem quickly and efficiently.
- Check the Fuses: Start by inspecting all fuses related to the battery system. Look for blown fuses (a broken filament inside the fuse). Replace any blown fuses with fuses of the same amperage rating. If a fuse blows immediately after replacement, this suggests a short circuit somewhere in the system requiring professional attention.
- Inspect Battery Connections: Examine the connections at both the battery terminals and the battery switch itself. Look for corrosion, loose connections, or damaged wires. Clean any corroded terminals with a wire brush and ensure all connections are tight and secure. A loose connection can interrupt the flow of electricity.
- Test the Battery Switch: With the connections secure and fuses intact, operate the battery switch. Make sure it clicks firmly into each position. If it feels loose or doesn’t move smoothly, the switch itself may be faulty and require replacement. You can use a multimeter to test for continuity across the switch terminals in different positions. A lack of continuity indicates a problem with the switch.
- Check the Battery Voltage: Use a multimeter to check the voltage of your batteries. Low voltage could indicate a charging problem, a faulty battery, or excessive draw from appliances. A fully charged 12-volt battery should read around 12.6 volts.
Troubleshooting Flowchart
A visual representation of the troubleshooting process can be helpful. The following flowchart Artikels the steps to diagnose a non-functional battery switch. Follow the arrows based on your findings at each step.Imagine a flowchart. It starts with a box labeled “Battery Switch Not Working?”. This leads to two branches: “Yes” and “No”.
The “No” branch leads to the end, indicating the problem is elsewhere. The “Yes” branch goes to a box: “Check Fuses”. This branches to “Fuses Blown?” with “Yes” leading to “Replace Fuses; Retest” and “No” leading to “Check Battery Connections”. “Check Battery Connections” branches to “Loose/Corroded Connections?” with “Yes” leading to “Clean/Tighten Connections; Retest” and “No” leading to “Test Battery Switch”.
“Test Battery Switch” branches to “Switch Faulty?” with “Yes” leading to “Replace Battery Switch” and “No” leading to “Check Battery Voltage”. “Check Battery Voltage” branches to “Low Voltage?” with “Yes” leading to “Investigate Charging System/Battery” and “No” leading to “Problem Unidentified – Seek Professional Help”. Each end point would have a concluding box.
Mastering your travel trailer’s battery switch is more than just knowing how to flip a switch; it’s about understanding your RV’s electrical system and ensuring reliable power for all your adventures. By following the safety guidelines, performing regular maintenance, and understanding the troubleshooting steps Artikeld here, you’ll be well-equipped to handle any power-related challenges and enjoy worry-free camping trips.
Remember, a little preventative care goes a long way in keeping your RV’s electrical system running smoothly!
Frequently Asked Questions
What happens if I leave my battery switch in the “both” position while driving?
Leaving the switch in the “both” position while driving can potentially drain your tow vehicle’s battery, especially if you have significant loads on your trailer’s electrical system. It’s best to switch to the “off” or “house” position when driving.
How often should I check my battery switch connections?
It’s a good idea to visually inspect your battery switch connections at least once a year, or more frequently if you use your travel trailer extensively. Look for corrosion, loose connections, or any signs of damage.
Can I use a battery switch designed for cars in my travel trailer?
No, it’s not recommended. Travel trailer battery switches are typically designed to handle higher amperage loads than those used in cars. Using an inappropriate switch could lead to overheating and potential fire hazards.
